[Papercraft Objects: Final Revision]
This week we completed our second milestone project! While the first prototype presented many areas of cleanup and lots to be desired I think I was able to fix a lot of what was wrong with the original prototype.
While it took a bit of work to clean up, the fixes were relatively easier than its construction. The model here came with some classy renders that look pretty darn spiffy in Rhino. I choose to use a red background in the mask redners to fit the asethetics of the orginal game that had a focus on red.
RENDERS!
And with the dagger I choose to use a plain white background as I found red clashed with the look I wanted for it.
I Included not only my versions of paper templates in Rhino but also what they looked like cut out. I used two sheets of grey and a sheet of black and white. Becuase I had such plain selection of colors to make it accurate to my referneces I picked up the Architeture cardstock pack from Micheals. It contained all the colors I needed and if you need a range of the same colors Micheals has tons of packs that are amazing. To start I had to cut out my project using the laser cutter. I had three colors I was using in this project to match with my models, white, grey and black.


Here is the Cardstock pack I talked about before. Its relativley cheap, around 6 dollars dor the pack of 5 shades and comes with a good amont of sheets.
Mask Rendition 2.0!


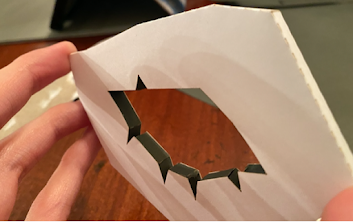
Shown here as I was constructing the piece The eye sockets went in a lot eaiser then when with the prototype so the extra thickness and new socket technique I used really seemed to work. Also here in the top photo we can see what the piece look like before it was merged and without the eye liner pieces. Without the added detailing it was quite plain.
A final glance at the two pieces side by side to really show how the little things made a good amount of difference.
My next piece was the dagger. This was assembled rather easily. A lot of the changes I made to the design came in adding little detailing that I ignored in my first pass. In the bare construction of my dagger you can see that it looks really plain jane boring right? That’s where the power of detailing comes in!
Let’s take a closer look at all my small pieces. Why don’t we? Here are the smaller detailing pieces, there’s quite a bit. The design for the dagger really comes to life with the little embellishments I can give it to make it feel more real. And when added all together….. TA DA!! Much more pretty than the plain white. In Comparing it to the prototype you see that I originally didn't have the black detailing pieces added (not even in a plain white). This was something I overlooked in my first pass and noticed after its construction. But as I said in my last post, there are bound to be mistakes in a prototype, am I right? Something though that really failed in the construction of my dagger was the inner piece of the dagger….
I tried to fix it but it wasn't cooperating with me and I couldn’t seem to figure out why? Similar to my eye socket problem, these pieces needed to be broken down into smaller pieces in order to fit properly without the shrinkage folding problem. But my eye socket piece worked relatively well so what could go wrong? Well that’s where my confusion lies. I printed out two separate versions of my inner strip, one connected one broken up into smaller segments and none of them fit? Which was weird. I had redone all my printing templates before I went to the laser cutter to absolutely make sure this exact problem didn’t happen, but something was off. I can only think of two reasons that this happened, either one, because the cut out I originally made from this was an odd shape the way it printed messed up or two, the more probable one, human error. Maybe it was something I was doing wrong, maybe when I was building it something went off, I’m not entirely sure. But I think it's important to recognize this as to make an important note of what need to be addressed in future endeavors.
Taking a final glance at our compared dagger the end result reallu is so much different when you focus on embelishments and little deatilling!


Dagger References!
FINAL PHOTOS!
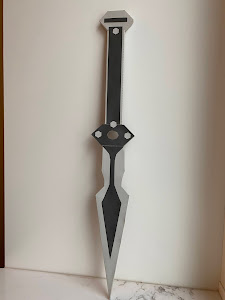
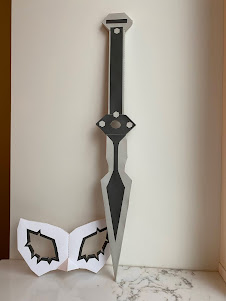
I also took some photos of both the objects together to see them in there final glorious forms!








Comments
Post a Comment